以红米 AX6S 为例,编译一个带 OpenClash 的 X-Wrt
路由器准备
解锁 Telnet
进入小米路由器后台192.168.31.1,通过固件升级,刷入开发版固件 https://www.right.com.cn/forum/thread-8173581-1-1.html
计算 root 密码
通过 SN 码在 https://www.oxygen7.cn/miwifi/ 计算出密码。
解锁 SSH
通过 Telnet 连接到路由器,账号为root,密码为上一步得到的结果。
telnet 192.168.31.1
通过命令解锁 SSH
nvram set ssh_en=1 & nvram set uart_en=1 & nvram set boot_wait=on & nvram set bootdelay=3 & nvram set flag_try_sys1_failed=0 & nvram set flag_try_sys2_failed=1
nvram set flag_boot_rootfs=0 & nvram set "boot_fw1=run boot_rd_img;bootm"
nvram set flag_boot_success=1 & nvram commit & /etc/init.d/dropbear enable & /etc/init.d/dropbear start
SSH 连接到路由器
ssh root@192.168.31.1
刷写 OpenWrt 自定义固件,其中/tmp/factory.bin替换为需要刷写的固件路径。
mtd -r write /tmp/factory.bin firmware
编译固件
X-Wrt 是一个面向普通用户的路由系统,它基于 OpenWrt 项目做了许多易用性的改进,目标是成为一个标准化的普通用户可以轻松使用的路由器系统。 建议使用 Ubuntu 系统作为编译环境,这里以 Ubuntu 18.04 作为例子,其他版本也是可以的。特别注意的是,整个编译过程,都是用普通用户操作,不要用 root 用户操作。
切换到普通用户
添加用户。
# Create a new user and follow prompts
adduser <user>
授予用户 root 权限,并切换为该用户。
# Add user to superuser group to unlock admin privileges
usermod -aG sudo <user>

# Then log in as the new user
su - <user>
安装软件包
安装编译所需要的软件包
sudo apt install build-essential ecj fastjar file flex g++ gcc-multilib g++-multilib gawk gettext git git-core java-propose-classpath libelf-dev libncurses5-dev libncursesw5-dev libssl-dev python python3 python3-distutils subversion unzip wget zlib1g-dev rsync qemu-utils
下载源码
下载 x-wrt 源码
git clone https://github.com/x-wrt/x-wrt.git
cd x-wrt

#更新代码tag:
git fetch origin

#列出可以使用的版本tag:
git tag
#注意摁 q 键结束
#或者直接获取最新发布版本
git describe --tags $(git rev-list --tags --max-count=1)

#选择并切换到指定的版本tag:
git checkout -f <tag-name>
#例如
git checkout -f 21.10_b202112032317
#或者
git checkout -f $(git describe --tags $(git rev-list --tags --max-count=1))

#更新代码:
./scripts/feeds update -a
./scripts/feeds install -a
下载 OpenClash 源码
# 同步源码
cd package/luci-app-openclash/luci-app-openclash
git pull

# 也可以直接拷贝 `luci-app-openclash` 文件夹至其他 `OpenWrt` 项目的 `Package` 目录下随固件编译
修改配置
# 拷贝设备模板
cp feeds/x/rom/lede/config.mediatek.mt7622 .config

# 上面已经cp 拷贝了模版配置到 .config
# 例如 cp feeds/x/rom/lede/config.mediatek.mt7622 .config
# 下面继续操作和修改

#1 执行
make menuconfig

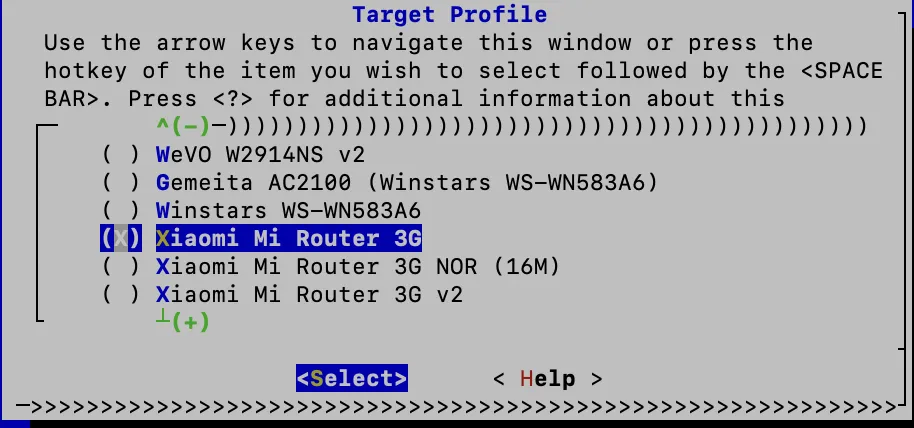
#2 进入 Target Profile 选择需要编译打包的设备型号,选择型号后立刻退出,保存

#3 执行下面的命令修复 .config
sh feeds/x/rom/lede/fix-config.sh

#4 再次执行 make menuconfig 然后立刻退出保存

#5 最后一次 执行 make menuconfig 自定义选择你需要的软件包
配置模板
在上述准备好的模版配置文件的基础上,执行make menuconfig命令进行个性化定制,增删应用。定位到各个子菜单,选择对应的软件包。

添加软件包
要编译到固件里面,就要选择<*>,如果只选择<M>只是编译成软件包ipk,不会打包进入固件。
进入LuCI - Applications子菜单下面,选择自己想要的应用
常见的软件包:
luci-app-aria2 ARRIA2 下载工具
luci-app-ddns DDNS 工具
luci-app-mwan3 MWAN3 负载均衡
luci-app-openvpn OPENVPN
luci-app-ksmbd Ksmbd 文件网络共享(samba 文件共享)
luci-app-upnp UPNP 设置
luci-app-wireguard WireGuard 配置界面
luci-app-natcap 远程界面管理模块和全锥形 nat 实现模块
luci-app-natflow-users 用户认证(用户流量显示)模块
luci-app-openclash OpenClash 插件
进入Kernel modules - USB Support菜单,选择 USB 支持的驱动
进入Kernel modules - Filesystems菜单,选择需要支持的文件系统,比如 ext4,ntfs,vfat 等
进入Kernel modules - Wireless Drivers菜单,选择无线支持的驱动,如果需要挂卡的驱动,也是在这里找
执行编译
make -j1 V=s
# j1 为单核编译
生成的包在bin/targets/下面
如果需要再次修改配置编译,只要不是换设备,都可以直接 make menuconfig 修改后就编译,如果需要修改设备,请从拷贝模版配置的地方重新开始配置。
安装固件
从bin/targets/下载得到编译完成的factory固件
通过 SSH 连接到路由器,刷写 OpenWrt 固件,其中/tmp/factory.bin 替换为需要刷写的固件路径。
mtd -r write /tmp/factory.bin firmware
